Difference between revisions of "Harbinger"
(→Phase 2) |
|||
| (3 intermediate revisions by 2 users not shown) | |||
| Line 1: | Line 1: | ||
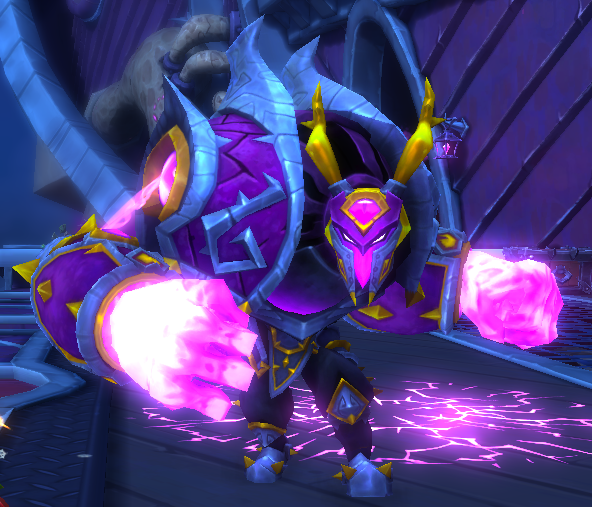
| + | [[File:Harbinger in his Armor.png|thumbnail|right|Harbinger in his armor on his ship]] | ||
| + | |||
Harbinger is the boss on the Harbinger's Warship mission. He has 4 phases. His attack patterns vary from each phase. | Harbinger is the boss on the Harbinger's Warship mission. He has 4 phases. His attack patterns vary from each phase. | ||
== Overall map objectives == | == Overall map objectives == | ||
| − | Defend the Ship's Engine from attacking monsters while defeating the Harbinger. Monsters will continuously spawn until the Harbinger is damaged enough to advance to the next phase. Players will be given a limited time of 90 seconds in-between each phase. (except the beginning where players have an unlimited time to build as usual) | + | Defend the Ship's Engine from attacking monsters while defeating the Harbinger. Monsters will continuously spawn until the Harbinger is damaged enough to advance to the next phase. Players will be given a limited time of 90 seconds in-between each phase. (except the beginning where players have an unlimited time to build as usual). The Harbinger charges at, and uses melee attacks, on players within his ship's open deck (Phase 1-3) or the prince's ship (Phase 4). If players are out of range, he will cast ranged missile attacks towards the players. The boss fight has 4 phases for each quadrant of his health, each of which introduce a new threat to the ship. |
| − | The Harbinger | ||
== Phase 1 == | == Phase 1 == | ||
| − | Harbinger will use the Harbinger Cannon on-board his ship to deal damage to the ship's engine. | + | Harbinger will use the Harbinger Cannon on-board his ship to deal heavy damage to the ship's engine. The Cannons can be destroyed. A [[Wyverns|Wyvern]] will spawn if the players takes too long to kill Harbinger. The [[Wyverns|Wyvern]] will drop an orange crystal, the Harbinger's Sight, when killed. This will double the damage done by the Hero. Infinite amounts of [[Goblins (Regular)|Goblins]] and [[Goblins (Bomb)|Bomb Throwers]] spawn from the three lanes. |
== Phase 2 == | == Phase 2 == | ||
| − | Another Harbinger Cannon will appear along with any previously undestroyed cannons. This time the Harbinger is able to open a section of his ship to suck players into it, rendering them unable to fight unless the players are able to escape it. | + | Another Harbinger Cannon will appear along with any previously undestroyed cannons. This time the Harbinger is able to open a section of his ship to suck players into it, rendering them unable to fight unless the players are able to escape it. The prison's floor is covered with a layer of green, poisonous fog which damages the player while they are in it. From inside there players will need to jump through a series of platforms to get out. |
| + | |||
| + | A group of 5 [[Kobolds (Flying)|Flying Kobolds]] will spawn every 85 seconds to attack the ship engine. This group will deal heavy damage to the Ship's Engine if left unattended. | ||
| + | |||
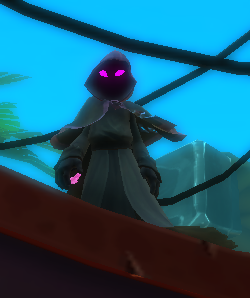
| + | [[File:Harbinger in his cloak.png|thumb|right|Harbinger wearing his cloak]] | ||
== Phase 3 == | == Phase 3 == | ||
| + | Another Harbinger Cannon will appear, along with any previously undestroyed cannons. Along with the actions of the previous phases, the Harbinger is able to summon meteorites on the Prince's Ship's Engine, players and any defenses he desires. This move can be cancelled if enough damage is dealt during the casting phase. [[Javelin Throwers]], [[Orcs]], [[Dark Mages]], and [[Witherbeasts]] can now spawn as well as the previous [[Enemies|enemies]]. Once again, [[Wyverns]] and [[Kobolds (Flying)|Flying Kobolds]] spawn if the player takes too long. | ||
| + | |||
== Phase 4 == | == Phase 4 == | ||
| + | Instead of spawning on his ship, the Harbinger now spawns on the deck of the Prince's ship, stopping the spawner near the front of the Prince's ship and instantly destroying any [[Defenses|defenses]] near him. Periodically, he will directly attack Ship's Engine by draining it's power. This move can be also be halted if enough damage is dealt during the attack. Once again, [[Wyverns]] and [[Kobolds (Flying)|Flying Kobolds]] spawn if the player takes too long, however this time the [[Wyverns|Wyvern]] will drop the crystal on the Warship, even if it is not killed. This phase will continue until the Harbinger is defeated. | ||
| + | |||
| + | == Rewards == | ||
| + | The Harbinger always drops Harbinger's Portal, it's a shield for the [[Squire]], along with other random loot on top of spawning a Victory Chest. | ||
Latest revision as of 02:31, 16 December 2018
Harbinger is the boss on the Harbinger's Warship mission. He has 4 phases. His attack patterns vary from each phase.
Overall map objectives
Defend the Ship's Engine from attacking monsters while defeating the Harbinger. Monsters will continuously spawn until the Harbinger is damaged enough to advance to the next phase. Players will be given a limited time of 90 seconds in-between each phase. (except the beginning where players have an unlimited time to build as usual). The Harbinger charges at, and uses melee attacks, on players within his ship's open deck (Phase 1-3) or the prince's ship (Phase 4). If players are out of range, he will cast ranged missile attacks towards the players. The boss fight has 4 phases for each quadrant of his health, each of which introduce a new threat to the ship.
Phase 1
Harbinger will use the Harbinger Cannon on-board his ship to deal heavy damage to the ship's engine. The Cannons can be destroyed. A Wyvern will spawn if the players takes too long to kill Harbinger. The Wyvern will drop an orange crystal, the Harbinger's Sight, when killed. This will double the damage done by the Hero. Infinite amounts of Goblins and Bomb Throwers spawn from the three lanes.
Phase 2
Another Harbinger Cannon will appear along with any previously undestroyed cannons. This time the Harbinger is able to open a section of his ship to suck players into it, rendering them unable to fight unless the players are able to escape it. The prison's floor is covered with a layer of green, poisonous fog which damages the player while they are in it. From inside there players will need to jump through a series of platforms to get out.
A group of 5 Flying Kobolds will spawn every 85 seconds to attack the ship engine. This group will deal heavy damage to the Ship's Engine if left unattended.
Phase 3
Another Harbinger Cannon will appear, along with any previously undestroyed cannons. Along with the actions of the previous phases, the Harbinger is able to summon meteorites on the Prince's Ship's Engine, players and any defenses he desires. This move can be cancelled if enough damage is dealt during the casting phase. Javelin Throwers, Orcs, Dark Mages, and Witherbeasts can now spawn as well as the previous enemies. Once again, Wyverns and Flying Kobolds spawn if the player takes too long.
Phase 4
Instead of spawning on his ship, the Harbinger now spawns on the deck of the Prince's ship, stopping the spawner near the front of the Prince's ship and instantly destroying any defenses near him. Periodically, he will directly attack Ship's Engine by draining it's power. This move can be also be halted if enough damage is dealt during the attack. Once again, Wyverns and Flying Kobolds spawn if the player takes too long, however this time the Wyvern will drop the crystal on the Warship, even if it is not killed. This phase will continue until the Harbinger is defeated.
Rewards
The Harbinger always drops Harbinger's Portal, it's a shield for the Squire, along with other random loot on top of spawning a Victory Chest.

